Part 2: Build your own UAV Predator drone.
This is a continuation of the Build your own UAV Predator drone. In this section I cover the configuration of the UAV and the testing.
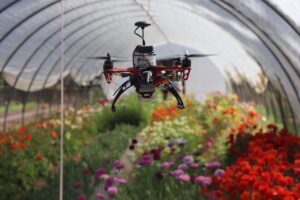
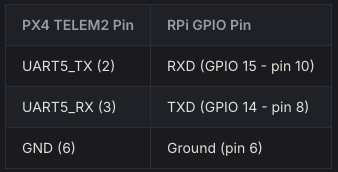
The main connection between the Raspberry Pi and the flight controller will be done through the telemetry port. The flight controller has two telemetry ports and in this case we are using telemetry port 2. See picture for the pin out between the two devices.
The Raspberry Pi will send flight instruction code to the flight controller and receive back data from the drone and send it back to a laptop (if within hotspot distance). Flight data logs will also be saved to both units after each flight.
To allow me to send and receive data from my laptop to the Pi, I create a wireless hotspot when the Pi was powered on and it did not detect a home network. This allowed me to SSH into the Pi from my laptop once the drone was powered on. When the drone was powered on, I could go to my available wireless networks on the laptop and would see “Mini Predator HotSpot”. Once connected to the hotspot I simply SSH into the unit to upload flight instructions or execute flight scripts.
Configuration of the Pixhawk:
I had installed Pi OS Lite (terminal only) on the Raspberry, but any compatible Linux OS’s will work. In order to allow the Pi to communicate with the flight controller a few things need to be configured below. This includes Python libraries, Dronekit (communication library) and MAVproxy (ground station). See code below for installation.
-sudo apt-get update
-sudo apt-get upgrade
-sudo apt-get install python-pip
-sudo apt-get install python-dev
-sudo pip install future
-sudo apt-get install screen python-wxgtk4.0 python-lxml
-sudo pip install pyserial
-sudo pip install dronekit
-sudo pip install MAVProxy
Next you need to configure the pi to send data through telemetry port:-sudo raspi-config
-Go to selection 3 INTERFACE OPTIONS
-Go down to P6 Serial Port (this allows you to communicate via serial port)
It will ask
“Would you like a login shell to be accessible over serial?” = NO
“Would you like the serial port hardware to be enabled?” = YES
OK
Exit out with TAB, it will ask to reboot. (For now you can say no)
Disable Bluetooth in Pi:
We need to disable a Bluetooth module that is using the telemetry port will use for the flight controller.
Type:-ls /dev/ttyAMA0
if its there we need to disable it .sudo nano /boot/config.txt
The config.txt file will load, GO TO THE VERY BOTTOM of the file make sure it has.-enable_uart=1
then bellow that add
-btoverlay=disable-bt
Save the file and exitsudo reboot
NOTE: Your connection will close if using ssh because you disconnected.
Connecting to the Pixhawk with SSH through the Pi:
Once you physically have the Pi connected to the Pixhawk through the telemetry port you now send commands.
SSH into your pi once logged in type-mavproxy.py --master=/dev/ttyAMA0
If you remember from above this is the port we enabled for telemetry and disabled the Bluetooth for.
Sending the Mini Predator on a mission:
The flight instructions that the Pi will send to the flight controller are written in Python. I have attached example of the code at the bottom of this page, which is a simple flight from one way-point to the next. But this code can be modified for as many way-points as needed, and in addition the drone I designed was controlling servo motors during flight for another project. I have also modified the drone to fly with and run SDR antenna and software on the PI to hunt for various frequencies.
When you want to run your python code on the drone type:
–python example.py --connect /dev/ttyAMA0
This will run your example.py code through the telemetry port giving the commands to the Pixhawk for flight.
Simulation and Flight:
Since the drone is autonomous and is basically a fire and forget system, I highly recommend doing a simulation with your code. Something like ArduPilot or X-Plane will allow you to perform this action prior to the actual flight. After writing your mission code, simply run your python script inside the software to simulate the flight. This ensures that your GPS coordinates, altitude, velocity and other flight telemetry are correct, because once you execute the script on the Pi there is little you can do to stop it after take off. I have attached a simple demo below of how the code is simulated on the laptop first, showing the flight with a map overlay and telemetry data, and later that same script tested on site.
Final Thoughts:
I was able to get about 20 minutes of flight time with the battery pack I used, with a small payload and was able to lift 1kg for a max payload. Nowhere near the payload of a AGM-114 Hellfire Missile, but with the a larger budget anything is possible.
from __future__ import print_function
from dronekit import connect, VehicleMode, LocationGlobalRelative
from pymavlink import mavutil
import time

# Set up option parsing to get connection string
import argparse
parser = argparse.ArgumentParser()
parser.add_argument('--connect', default='127.0.0.1:14550')  #this makes a connection between pi and pixhawk
args = parser.parse_args()

# Connect to the Vehicle
print ('Connecting to vehicle on: %s' % args.connect)
vehicle = connect(args.connect, baud=57600, wait_ready=True)

# Function to arm and then takeoff to a user specified altitude
def arm_and_takeoff(aTargetAltitude):

  print ("Basic pre-arm checks")
  # Don't let the user try to arm until autopilot is ready
  while not vehicle.is_armable:
    print (" Waiting for vehicle to initialise...")
    time.sleep(1)

  print ("Arming motors")
  # Copter should arm in GUIDED mode
  vehicle.mode    = VehicleMode("GUIDED")  #set mode of the drone to start.
  vehicle.armed   = True

  while not vehicle.armed:   ##will not go on unitl armed
    print (" Waiting for arming...")
    time.sleep(1)

  print ("Taking off!")
  vehicle.simple_takeoff(aTargetAltitude) # Take off to target altitude

  # Check that vehicle has reached takeoff altitude
  while True:
    print (" Altitude: ", vehicle.location.global_relative_frame.alt)
    #Break and return from function just below target altitude.
    if vehicle.location.global_relative_frame.alt>=aTargetAltitude*0.95:
      print ("Reached target altitude")
      break
    time.sleep(1)

# Initialize the takeoff sequence to 2 meters altitude
arm_and_takeoff(2)

#simple delay of how long you want it to hover before moving to the next way point.
time.sleep(5)

print ("Take off completed")

#set the initial speed
print("Set default/target airspeed to  2 m/s")
vehicle.airspeed = 1

#GO to first way point CHANGE GPS LOCATION BELOW TO SOMETHING YOU WANT ##
print("Hover to first waypoint at 1 m/s maintain 2m alt")
point0 = LocationGlobalRelative(12.345678, -123.45678, 2)  #CHANGE THESE GPS POINTS!!!!!!! #make a variable for location lat and long, the 2 represents altitude
vehicle.simple_goto(point0, groundspeed=1) #command to goto a location above at a groundspeed of 2m/s this changes speed.

#delay between 2 points you can remove this if needed but if you are using the simulation will need the wait time to allow the
#simulation to catch up
time.sleep(10)

#go to second way point  CHANGE GPS LOCATION BELOW TO SOMETHING YOU WANT ##
#print("Go to second waypoint at 1 m/s maintain 15m alt")
point1 = LocationGlobalRelative(12.34567, -123.4567, 2)  #CHANGE THESE GPS POINTS!!!!! make a variable for location lat and long, the 2 represents altitude
vehicle.simple_goto(point1,groundspeed=2)  #command to goto a location above at a groundspeed of 2m/s this changes speed.

# Use this to display current battery status to determine how much flight time you have.
print("Battery State: %s" % vehicle.battery)

print("Land Drone")
vehicle.mode = VehicleMode("LAND")
#set to land the vehicle.

# Close vehicle object before exiting script
print("Close vehicle object")
vehicle.close()